PALLET GARDENING
Vertical gardens are all the rage and we are seeing them everywhere made from
recycled pallets. From Pinterest to HGTV to all the decorating magazines
including Better Homes and Gardens and Southern Living, pallet gardens are
everywhere! They are an easy way to garden vertically and there's so many
reasons to do it: 1) space limitations, pallet gardens do not take up
a lot space; 2) pallet gardens add an architectural element to outdoor decor; 3)
fruits & veggie plants lend themselves to growing vertically, like cucumbers
or strawberries; 4) increase your growing space. No matter the
reason, gardening vertically can be fun and rewarding.... and simply put, pallet
gardens look fantastic!
Many veggies and flowers are perfect for growing vertically, just be sure
that what you choose has similar water requirements.
RECOMMENDED PLANTS:
- EDIBLES: strawberries, cantaloupe, cucumber, eggplant, okra, peppers-hot,
peppers-sweet, squash, tomatoes, watermelon - FLOWERING PLANTS: begonias, marigolds, petunias, celosia, verbena, coral
bells, impatiens - SUCCULENTS: portulaca, Ice plant, purslane, hens and chicks,
sedums
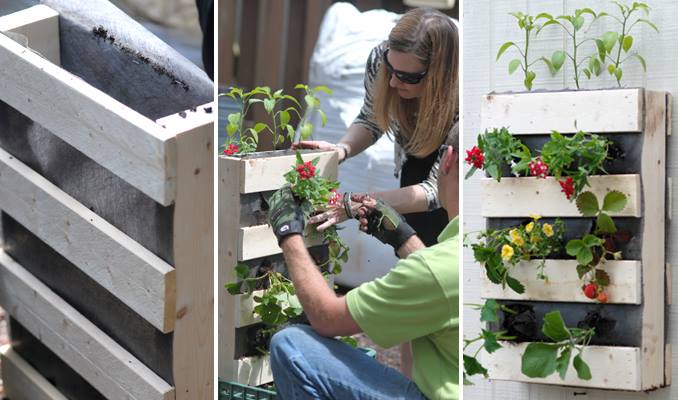
HERE'S HOW YOU DO IT:
We’ve assembled some quick and easy instructions to get you started. We sell
pre-constructed pallets for easy growing. The pallet is made of
untreated pine lined with Typar landscape fabric to keep the soil in place.
- Place the pallet on end and fill with potting soil. Be sure not to pack too
full so that the landscape fabric is bulging, but tap the soil down so it levels
out. - Pick out your plants to use for planting.
- Cut or use your fingers to create a small hole or planting pocket (about the
size of the roots of the plant) and sprinkle in Espoma's Garden Tone
fertllizer. - Place plant in the hole and use your fingers to cover the roots with
soil. - Space plants out on each row of the pallet. We suggest about 3 inches
apart. - Finish planting by adding edibles or flowering plants to the top of the
pallet. - Water. When you water, turn it vertical with the open side up and slowly
water every 2-3 days during spring, and then almost everyday during summer.
Sometimes, water may need to be added directly to young seedlings when pallet is
laying flat. But, be sure to allow enough time for the water to seep down
through the soil to get to the bottom plants.
 RSS Feed
